Unpacking a Double-Packed RAT - Identifying and Defeating Malware Packers
Recently, I’ve been working on reverse engineering over my weekends, as my work has been mostly focussed on other areas over the last couple of months - and reverse engineering is a complex, technically demanding skill that I find atrophies quickly if not used. To that end I decided to work on malware by technique; brush up on the theory of the technique, learn the rules for detecting and defeating the technique, then reverse engineer samples found in the wild to apply the skill. For the last couple of weeks, that technique has been Process Injection [T1055], which is where one process injects code into the memory space of itself or another process; I’ll give more love to process injection in this blog at a later time, as of right now, we’ll be looking at something else - Packers.
While working on a sample that does DLL injection, I came across quite a laborious unpacking process that I wanted to share, this sample is the first I’ve seen to use double-packing to obscure itself, and it tripped me up for an hour or so until I worked out what it was doing. So for this blog, we’ll go into what packers are, how they pack programs, and finally a set of rules and a process for identifying and defeating packers using the sample I worked on as an example.
What are packers?
Modern malware necessitates the requirement to have protections to evade endpoint detection tooling, with the added benefit of impeding reverse engineers by protecting its payload and internals from investigators. Packers are a great option for malware authors to achieve these goals, packers themselves are tools used to compress and obfuscate an executable file by “wrapping” the executables’ user code to make it impossible to read without first unpacking it - not too different from how an archive works.
There are different types of packers, many of which are free and open source, packers themsleves aren’t malicious, but their high use in the malware world means the word packer has become synnonymous with malware; some common free and open source packers include UPX (ultimate packer for executables), NSPack, and MPRESS. Commerical packers also exist like VMWare Protect, Themida, and Armadillo. Becuase commerical packers are backed with a lot of research and resources, programs packed in these packers are very difficult to unpack; luckily not many malware families use these packers.
Finally, some packers were built specifically for malware, known as crypters - created by threat actors and sold on darknet markets. One thing to note is that packers and crypters have similar goals and fall into the same “family”, but describe different capabilities:
Packers reduce the virtual file size through compression by turning it into a self extracting archive
Crypters don’t really care how big the file is, they use different algorithms (dependant on brand of crypter) to obfuscate the user defined code (the malware code)
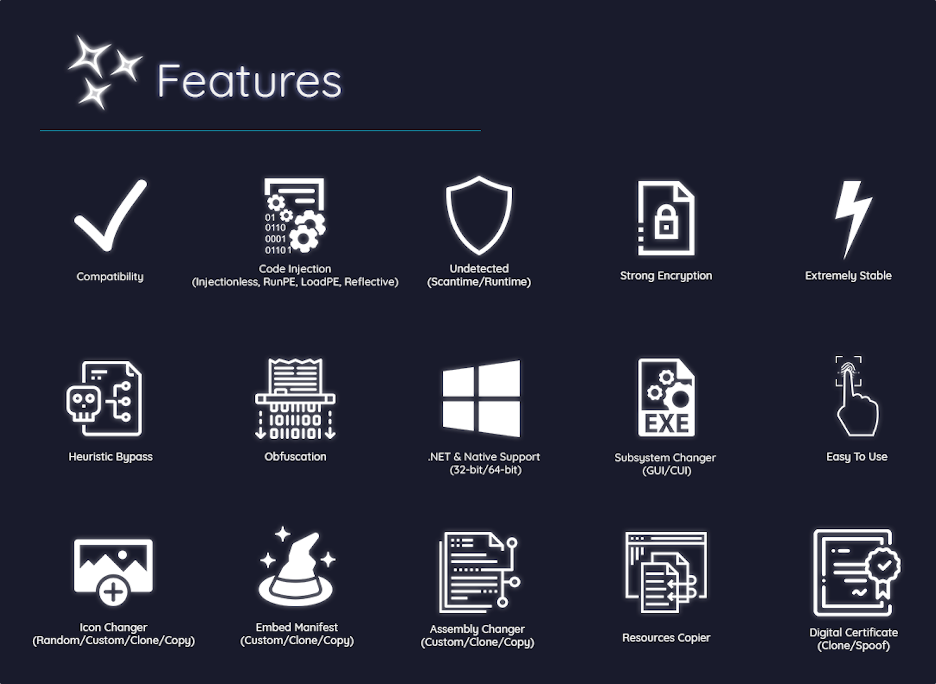
Because of how difficulty crypters are to build, threat actors will often buy them from darknet markets, below is an example of a crypter, Polycrypt.
I’ll cover crypters in more detail in a future blog as going into insane detail on crypters specifically is out of scope for this one.
Packer Architecture
For this section, assume I am talking about free and open source packers and general packing software, rather than more specialised tooling described above. When a malicious program is run through a packing software like UPX, the packer program encrypts and compresses the PE sections (.text, .data, .rdata, .rsrc etc). The packer also adds an unpacking stub, a (mostly) small section of code responsible for decrypting the executable in memory ones the executable has been run; as the executable can’t run its code until it’s decrypted.
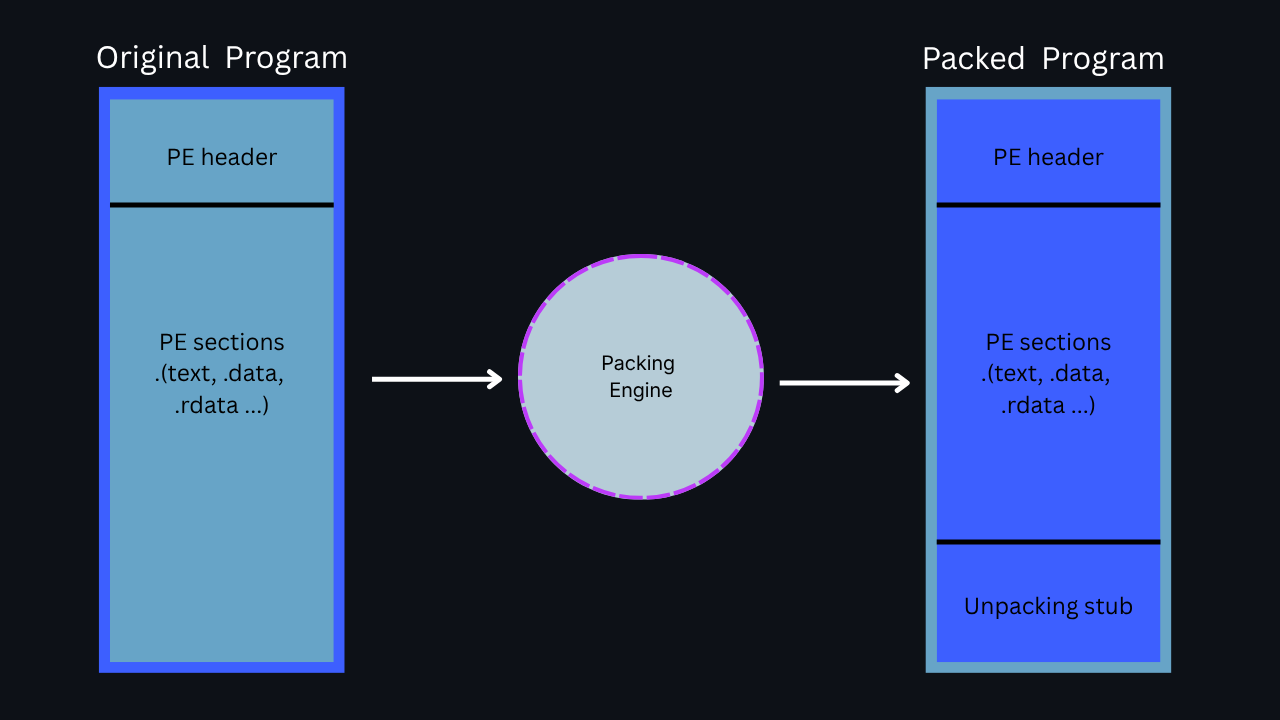
Following the picture above, the original program is run through the packing engine, which takes the user defined code and the data and encrypts (packs) it; the packing stub is added to the packed program also. When the program runs, the unpacking stub decrypts the packed code and data, loads the unpacked code into memory, and executes the payload by transferring control to the Original EntryPoint (OEP).
Resolving Imports
Once the malware’s payload has been unpacked into memory, the unpacking stub must also resolve the imports of the original executable; imports being the Windows DLLs that allow the executable to funtion within a Windows environment. This is worth bringing up because, as malware is packed, the import address table (IAT) is often obfuscated to mask the intent of the malware and defeat basic static analysis. To this end, the IAT must be rebuilt for the malware to perform the actions it was designed for.
Its pretty common for packed malware to contain some imports, including the LoadLibraryA and GetProcAddress. Both of these functions are often used to load additional libraries, resolve function addresses, and rebuilt the IAT of the original executable.
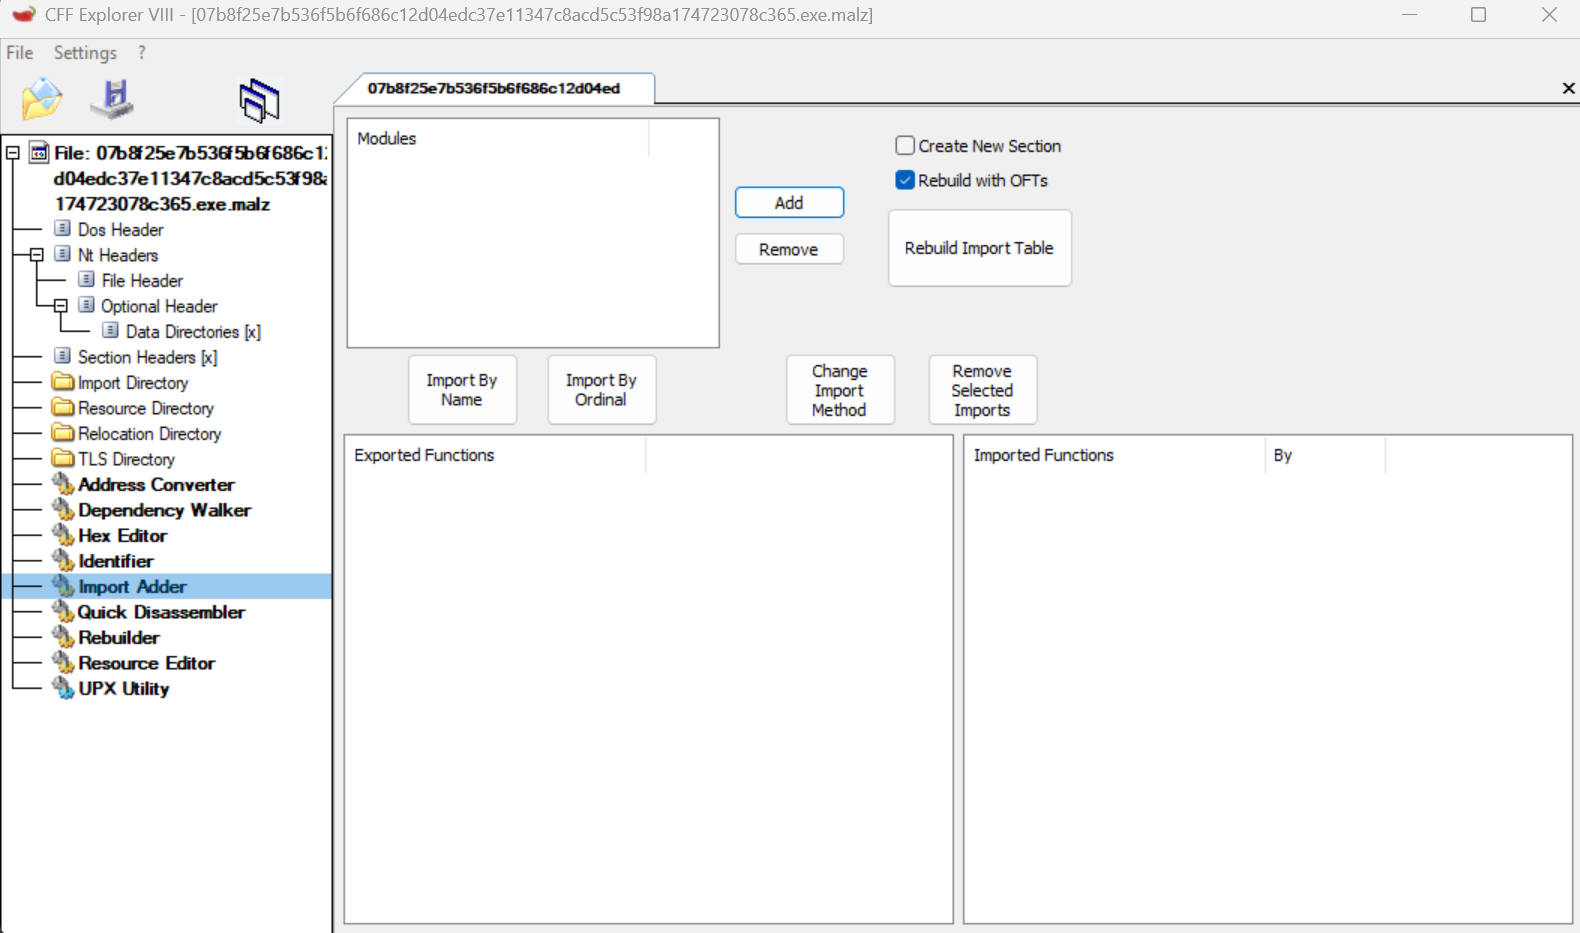
Though sometimes, packed malware would show no imports (an empty IAT). In that instance, the packer stub would have to do the heavy lifting to resolve all of the imports. Looking at the picture below, with a packed malware sample open in CFF Explorer, you’ll notice there are no visible imports and exports.
In any case, whether its the packer stub or the malware itself that rebuilds the IAT, in any case you should keep a close eye on LoadLibraryA and GetProcAddress in these instances.
Transferring execution to the Original EntryPoint (OEP)
Once the malware is unpacked and the IAT is rebuilt, the packer stub needs to transfer execution from it’s own code to the OEP of the executable; the OEP is where the actual malware’s execution will begin. This transfer of execution, often called a tail jump usually appears in the form of a jump (jmp), return (ret), or a call instruction at the end of the unpacking stub. Once the requisite instruction is hit, the program control will be transferred to the unpacked code in memory (you won’t see a file creation event), and that unpacked code will finally run.
Process injection sometimes come hand in hand with packing, so when analysing you may see memory allocation and writing via VirtualAlloc, VirtualProtect, and WriteProcessMemory; as I’ve stated before, process injection will get love in a later blog.
Identifying packed malware
In practical terms, there are a few ways to identify whether malware is packed, this is the easy part. Defeating the packer(s) will be where things get interesting.
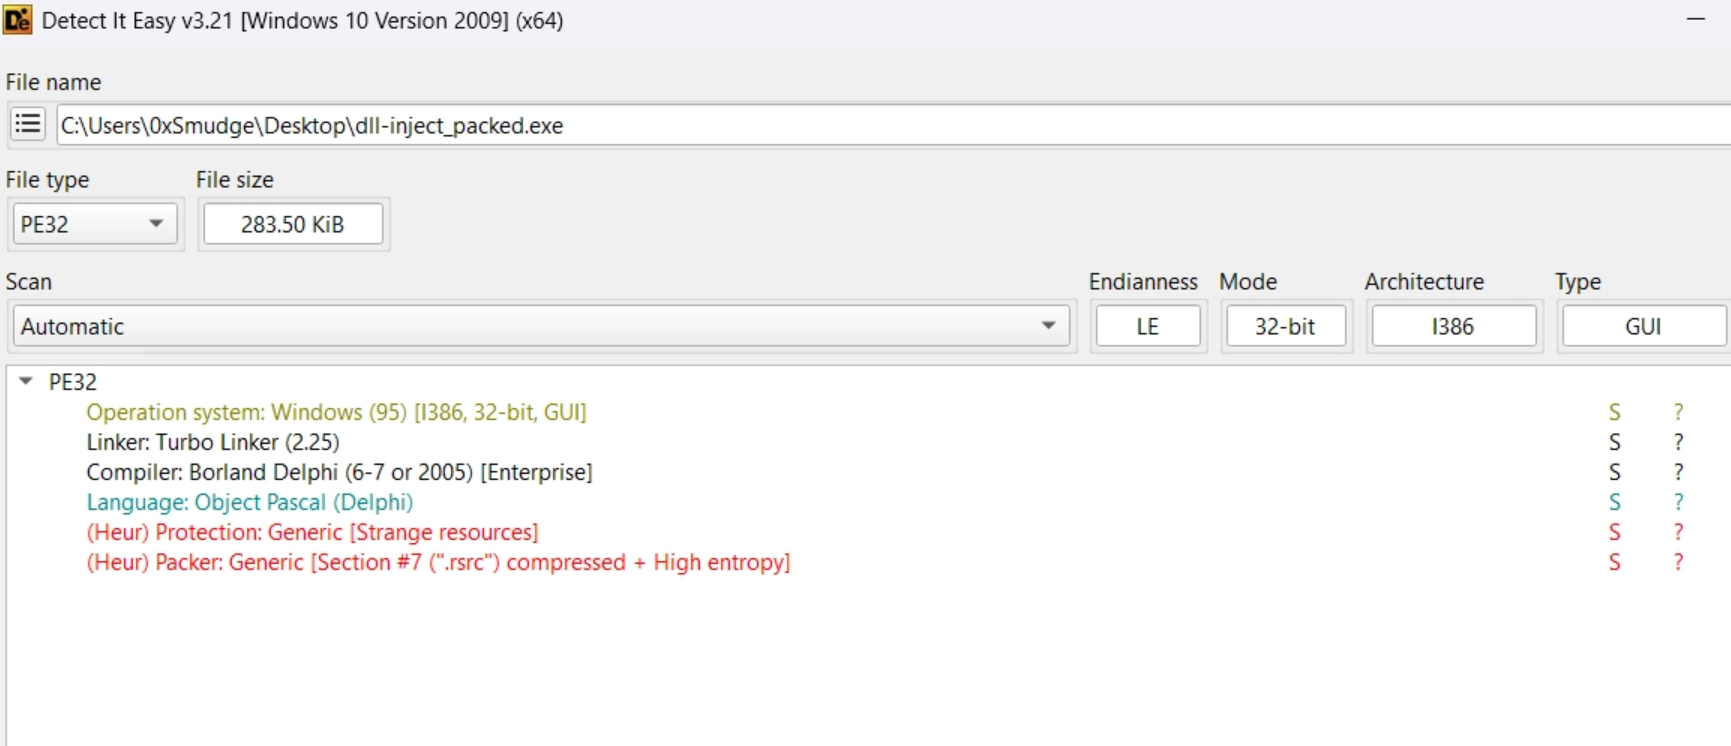
Automated packer detection
Plenty of tools can detect the presence of packers and just tell you how it is. This isn’t 100% accurate but serves as a great first step:
Viewing Imports and IAT
One of the simplest and most effectrive ways to detect packing is to look at the IAT and imports. You can use DetectItEasy, CFF Explorer, PEStudio, PEBear, or a multitude of other tools to achieve this. The screenshot below is from PEStudio, notice the very small number of API functions and the presense of LoadLibraryA and GetProcAddress:
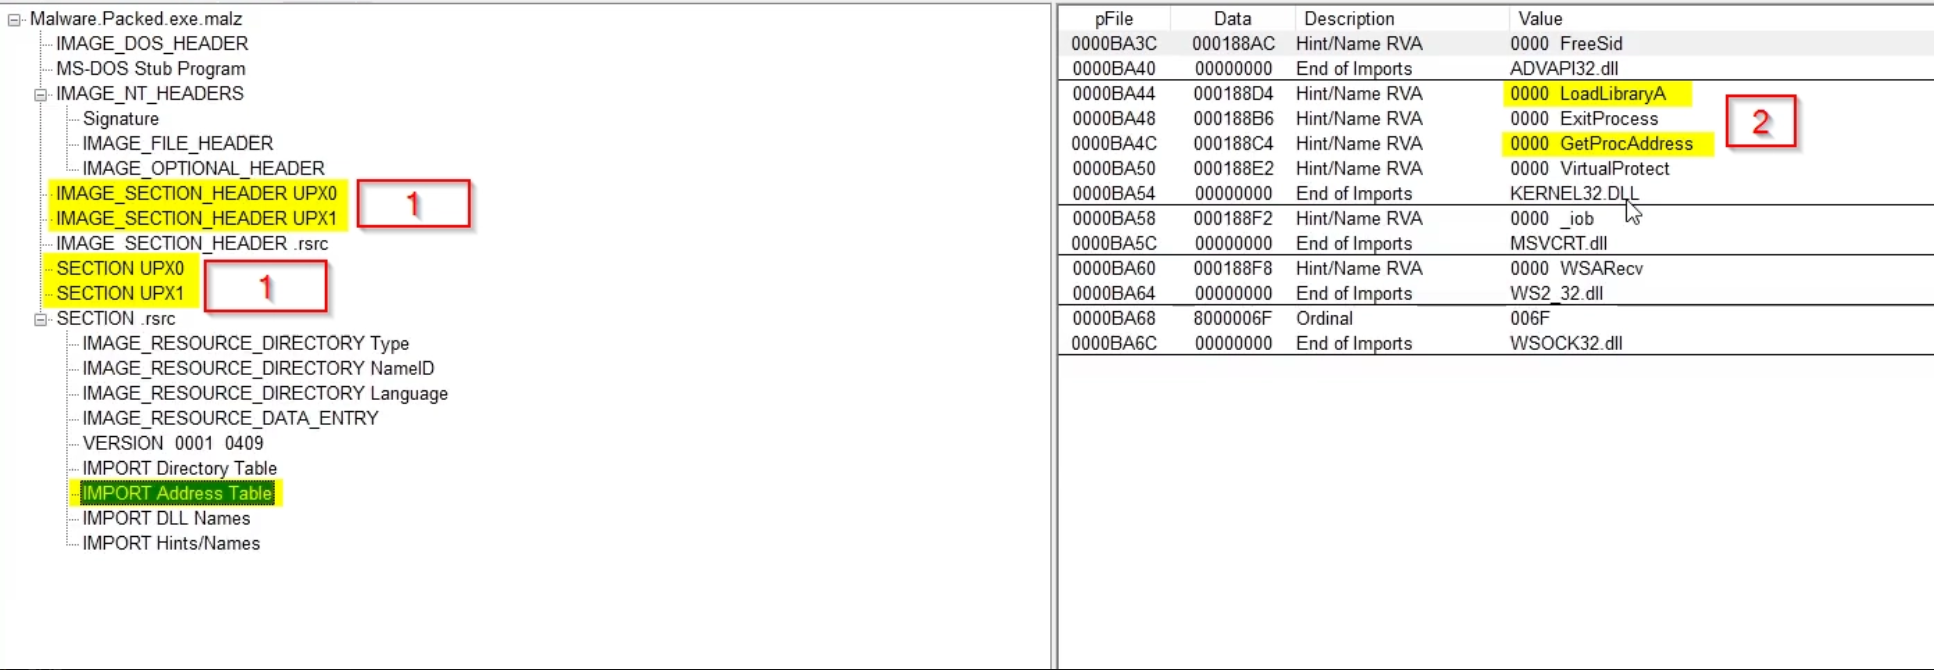
In unpacked malware, you can expect to see many more, easily above 20 in an unpacked sample.
File entropy
File entropy is a measure of randomness in a file’s data, scored on a scale of 0 to 8. A score of 0 represents perfectly ordered data (such as a file of all zeroes), while a score of 8 represents perfectly random data. Compressed or encrypted data — like a packed payload — scores very highly, typically above 7.0, because the compression or encryption process destroys patterns in the data. Legitimate compiled code sits in the middle range, usually between 5.0 and 7.0. When DIE or another tool reports high entropy across a section or the whole file, it’s a strong indicator that something has been packed, encrypted, or otherwise obfuscated.
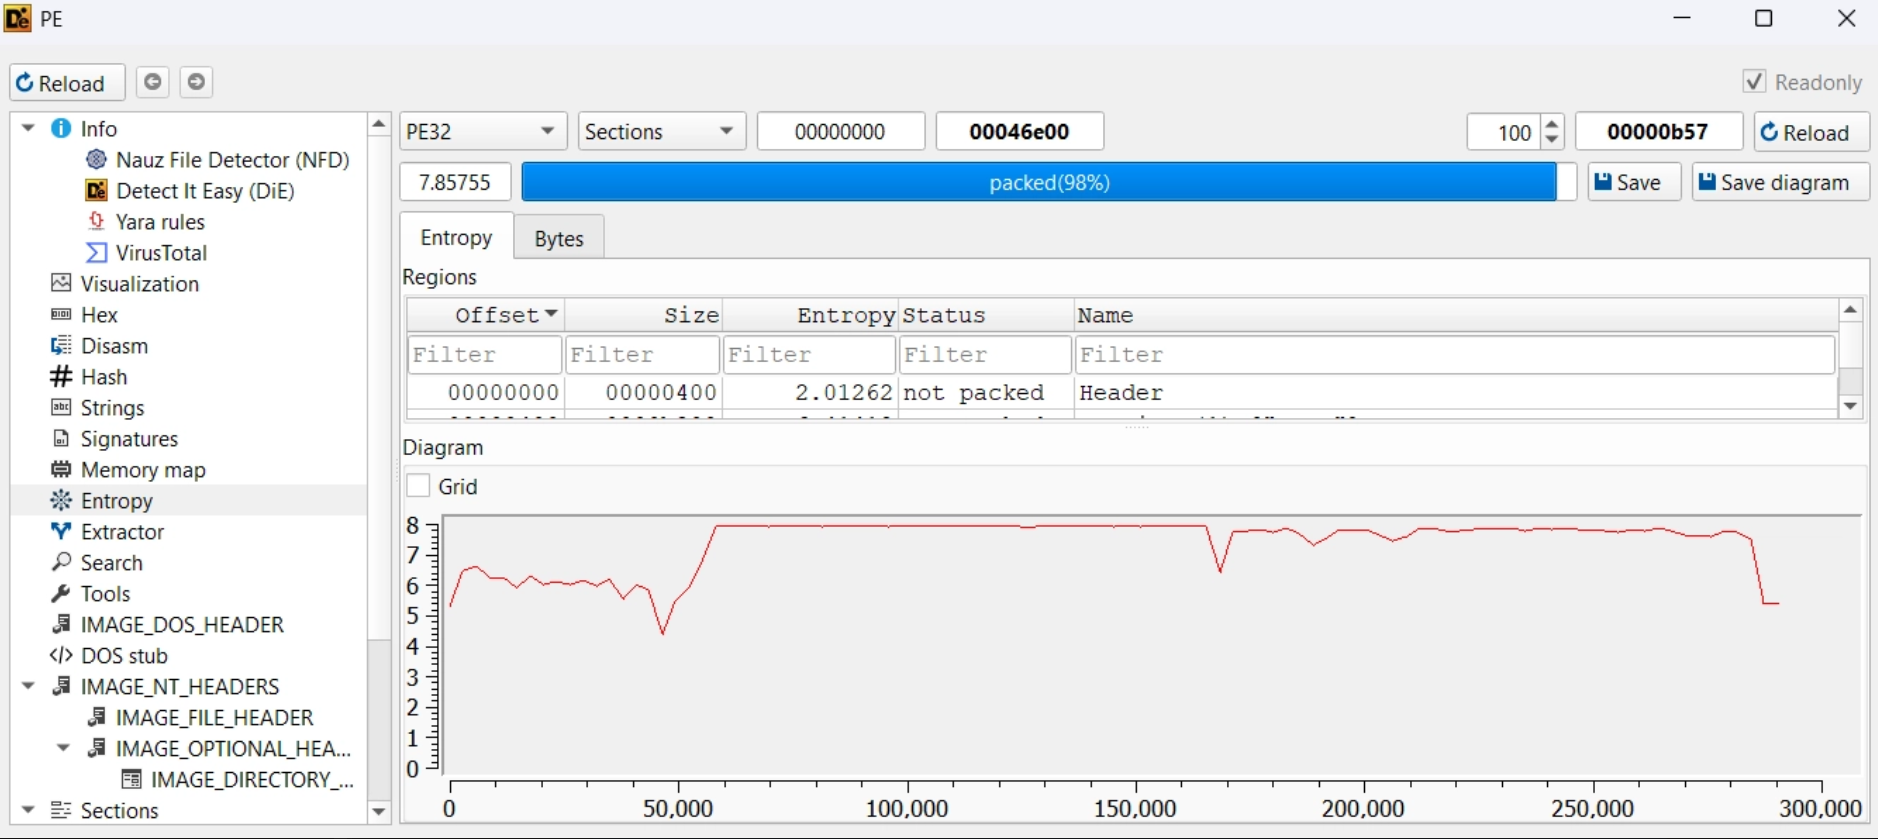
In the picture above, you’ll notice the graph shows most of the executable’s entropy sits at 8, the maximial value. DetectItEasy also provides entropy per region, if you see sections like the .text and .data sections sitting at high entropy, you could say with high confidence that the file is packed.
Virtual Size v Raw Size
When a PE file is packed, the raw size of its sections on disk will be significantly smaller than the virtual size those sections occupy when loaded into memory. This discrepancy exists because the packer stores compressed or encrypted data on disk, which expands to its full size only at runtime during unpacking. A legitimate compiled binary will have raw and virtual sizes that are broadly comparable - a large gap between the two, particularly in the executable section, is a strong indicator that unpacking is occurring at runtime. The image below shows an example of the discrepency between raw and virtual file sizes
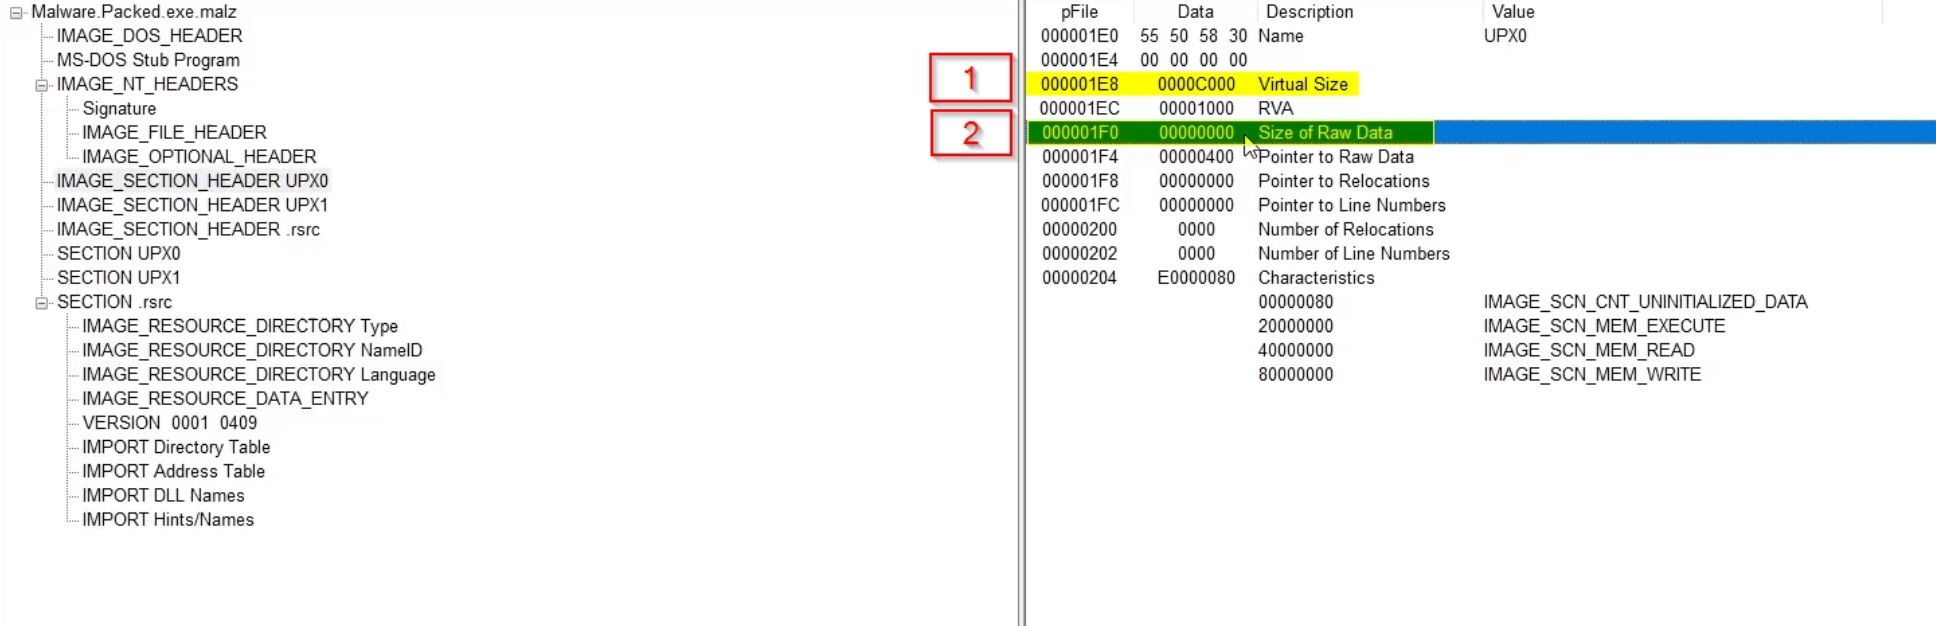
In this example from PEStudio, the UPX0 section has a Virtual Size of 0x0000C000 (49,152 bytes) but a Size of Raw Data of 0x00000000; zero bytes on disk. The section exists purely as a placeholder in the PE header, with the actual content written into it at runtime by the unpacking stub. This is one of the most telling signs of a packed executable.
Automated Unpacking
Once you’ve identified that the file is packed, you could try to use automated unpacking which is simple and fast, but doesnt’t always work; but worth a go anyway. Soe automated unpackers include:
- Un(i)Packer which uses code emulation to unpack MPRESS, ASPack, and UPX; among others
- UniExtract2 which is good at unpacking common packer types
- UPX utility which is designed to pack and unpack UPX packed binaires specifically
For example, using the UPX utility from the command line, you simply need to pass the -d flag to unpack the file:
1
upx -d file.exe
If the UPX output says “not packed by UPX” then you’d need to consider another auotmated packer, or unpack manually (which we’ll go through). There are also other options such as allowing the malware to unpack itself in a controlled environment, then using a tool like pe-sieve to extract the unpacked PE cleanly from the running process, which is the approach we take in the worked example below.
Worked Example
Finally, we are onto the main part of this blog, the analysis of malware to identify evidence of packing and extract the payload, we’ll use both manual and automated techniques where relevant.
Sample Details
Sample Hash:
07b8f25e7b536f5b6f686c12d04edc37e11347c8acd5c53f98a174723078c365
Triage in DetectItEasy
Openeing the sample in DIE flagged the sample as (Heur) Packer: Generic, and DIE showed high entropy and no imports, all signs as described before that there is a packer in play.
Manual Analysis using x32dbg
With packing being established, let’s open the sample in x32dbg and begin the process of extracting the unpacked payload. You’ll then want to hit Run ➡️ twice to run past the Windows initialisation steps and hit the EntryPoint (this isn’t the user defined EntryPoint by the way, its the packer).
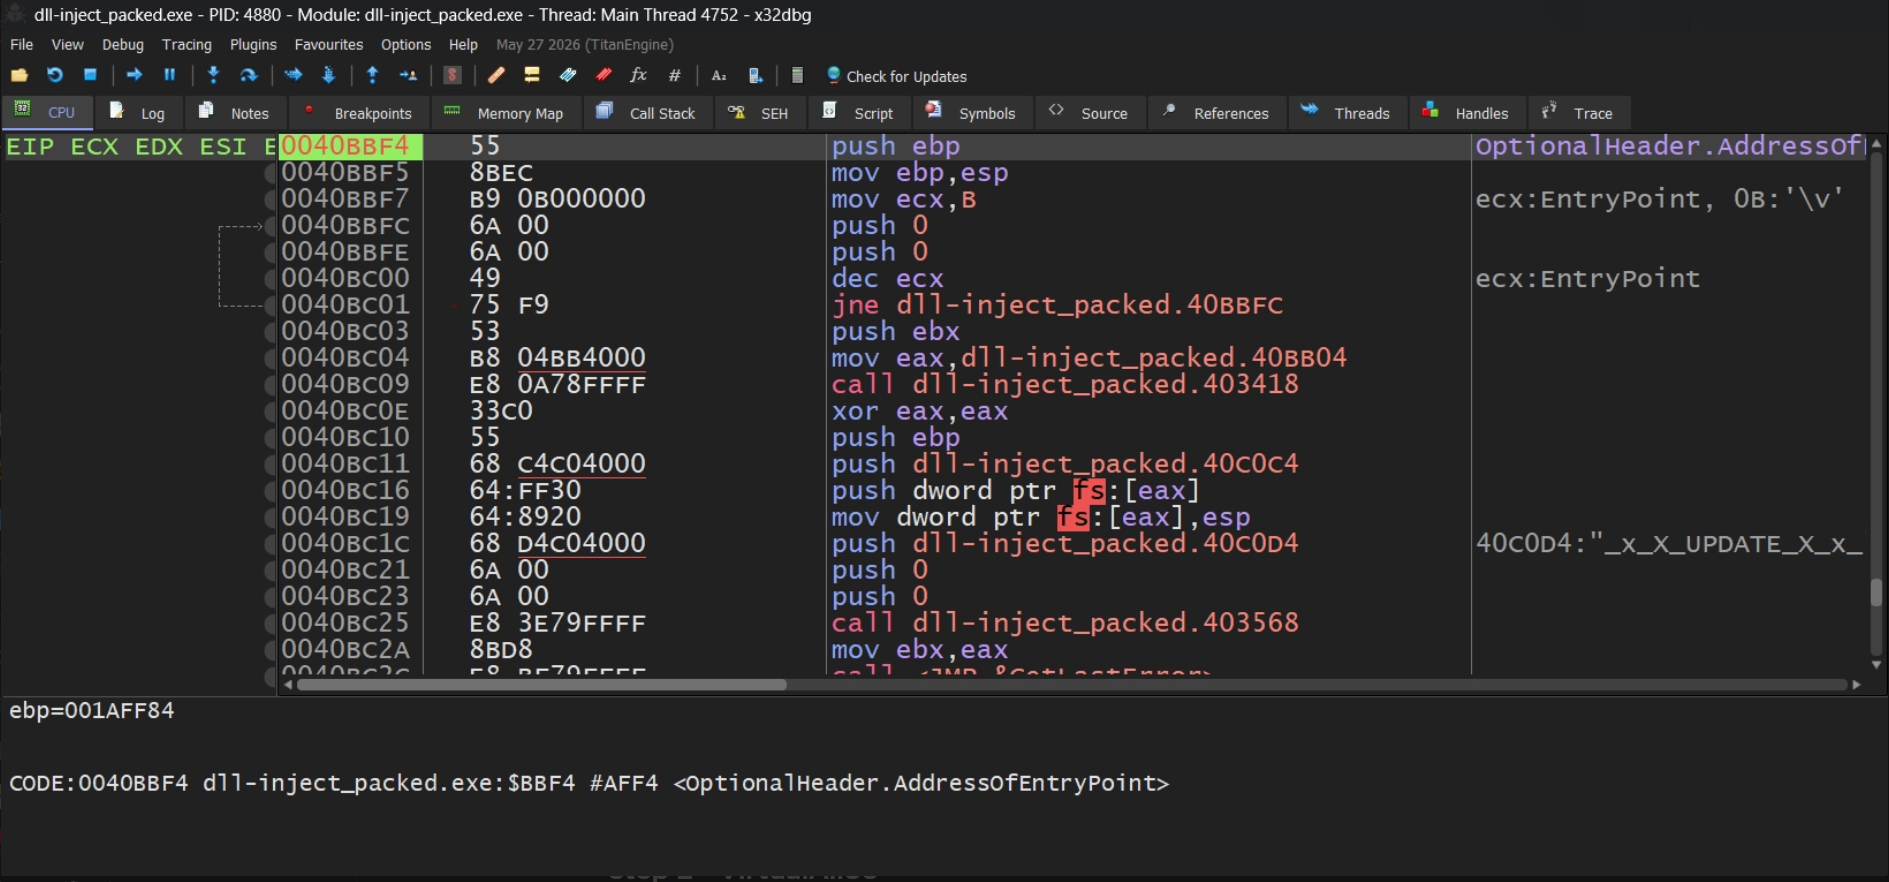
Since the unpacking stub must allocate memory for the newly unpacked executable, we can assume that Windows functions for memory allocation and wriing will be used. The idea is to set breakpoints on these API functions so we can monitor how those functions are being used. In this example we’ll breakpoint VirtualAlloc.
1
bp VirtualAlloc
VirtualAlloc
In most cases, VirtualAlloc is used for allocating memory in userland, but VirtualAllocEx and malloc can also be used. With the breakpoint set on VirtualAlloc. Click Run ➡️ twice to get to the first VirtualAlloc call. The screenshot below shows the VirtualAlloc breakpoint being hit from the packer code.
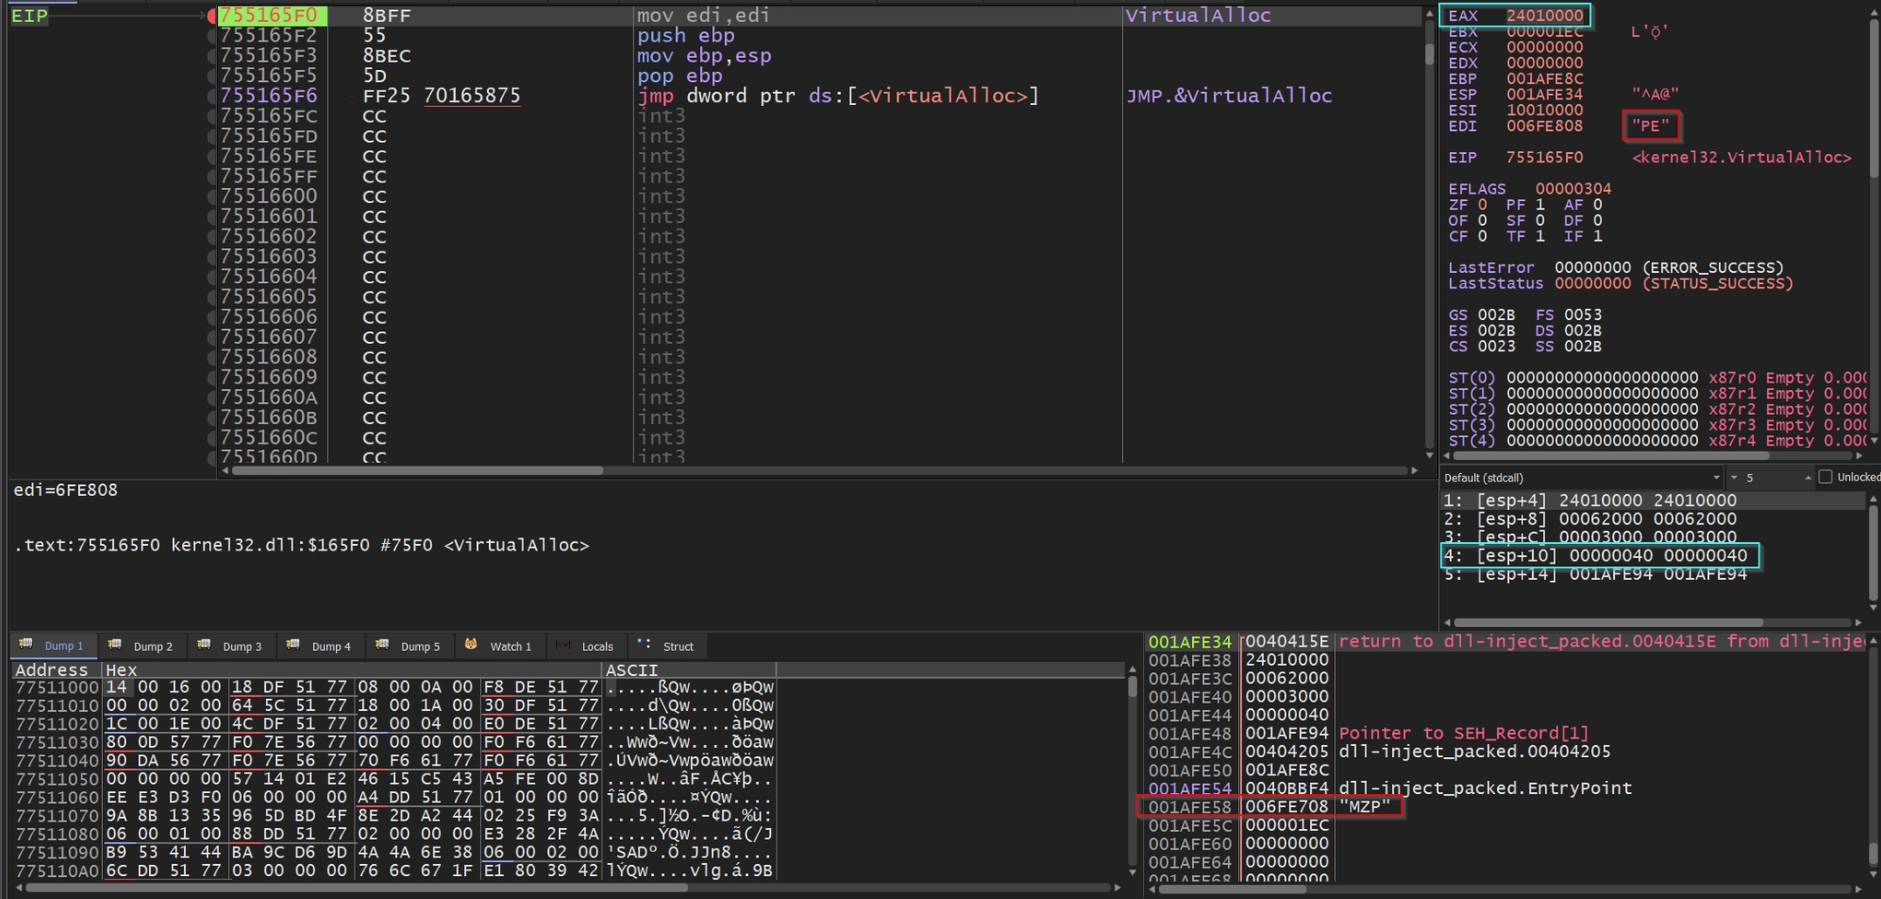
Reviewing the screenshot, the below interesting parts are below:
Registers (top right):
EAX = 24010000- the address being allocatedEDI = 006FE808 "PE"- a PE header already visible in memory, highlighted in redEIP = 755165F0 <kernel32.VirtualAlloc>- confirms we’re at VirtualAlloc
Stack arguments (bottom right):
[esp+4] 24010000- base address for allocation[esp+8] 00062000- size (~400KB)[esp+C] 00003000-MEM_COMMIT,MEM_RESERVE[esp+10] 00000040-PAGE_EXECUTE_READWRITE- a generally suspicious flag
Call stack (bottom right panel):
return to dll-inject_packed.0040415E- confirms VirtualAlloc is being called from the packer’s own code, not Windows initialisationdll-inject_packed.EntryPointvisible further down
Also notable:
006FE708 "MZP"visible in the stack — PE header already in memory, highlighted in red
In x86 Windows calling conventions, function return values are generally stored in
EAX. SinceVirtualAllocreturns a pointer to the allocated memory region, checkingEAXimmediately after the call returns gives us the address of the newly allocated region.
Viewing EAX Return
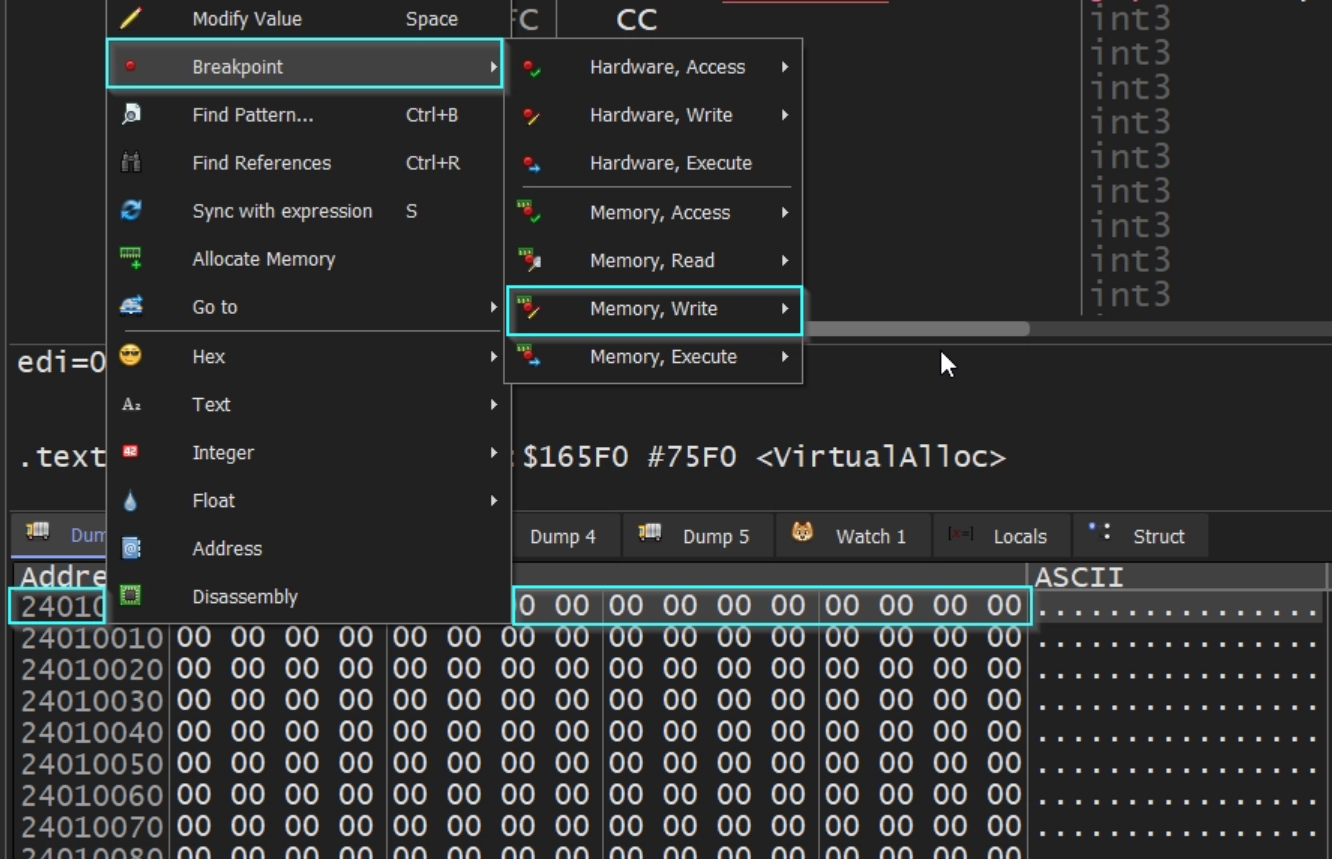
Next we will want to see what 24010000 will contain. Hit Run till Return ⬆️ then right click inside the Dump section and click “Go To → Expression” then put the EAX (24010000) address in there, then hit OK.
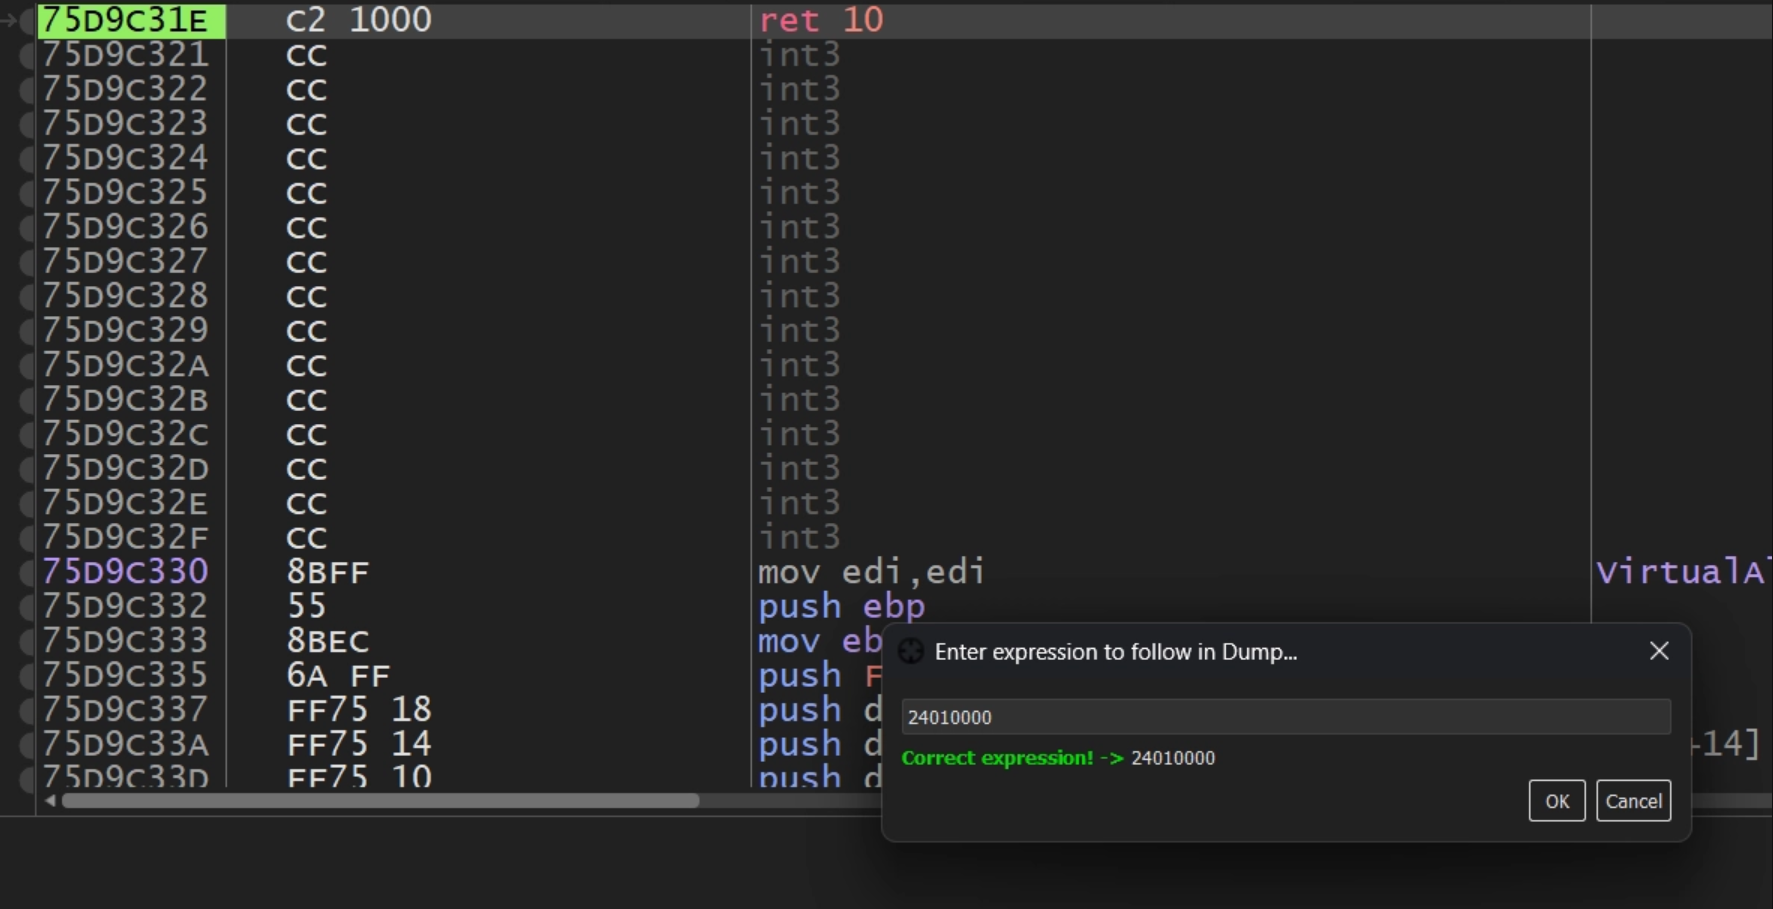
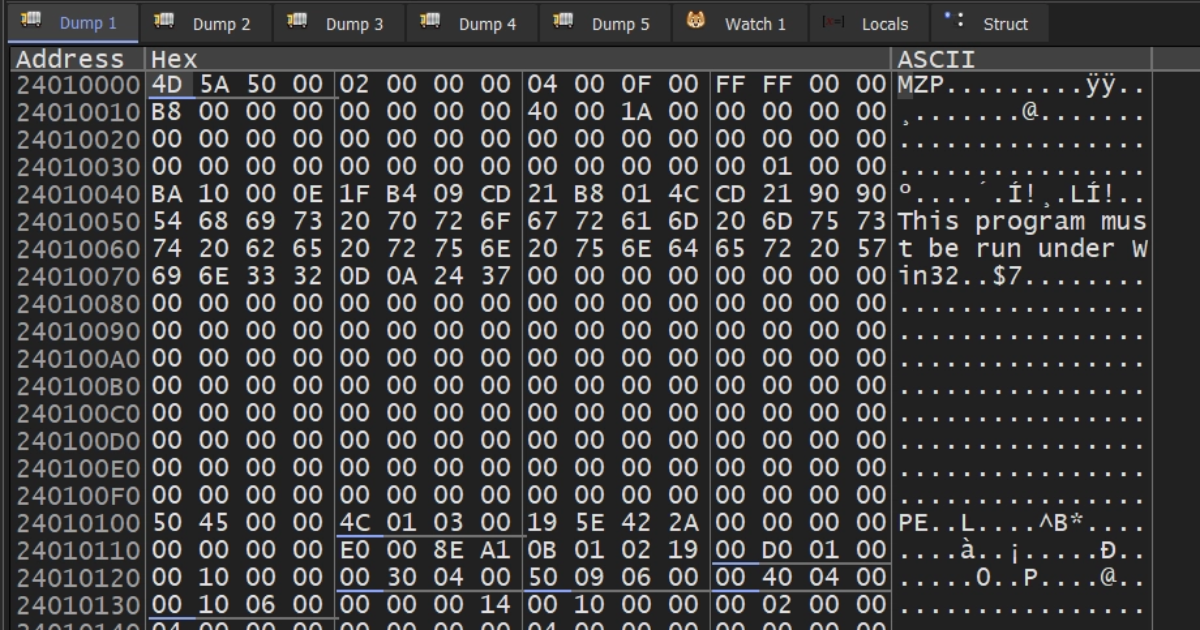
That’ll take you to the EAX return in the dump, notice how it’s all zeroed out ready to be written to (since VirtualAlloc allocated the memory space). Notice in the screenshot below all of the bytes in and around 24010000 is all zeroed out, almost like something will get written there 🤔.
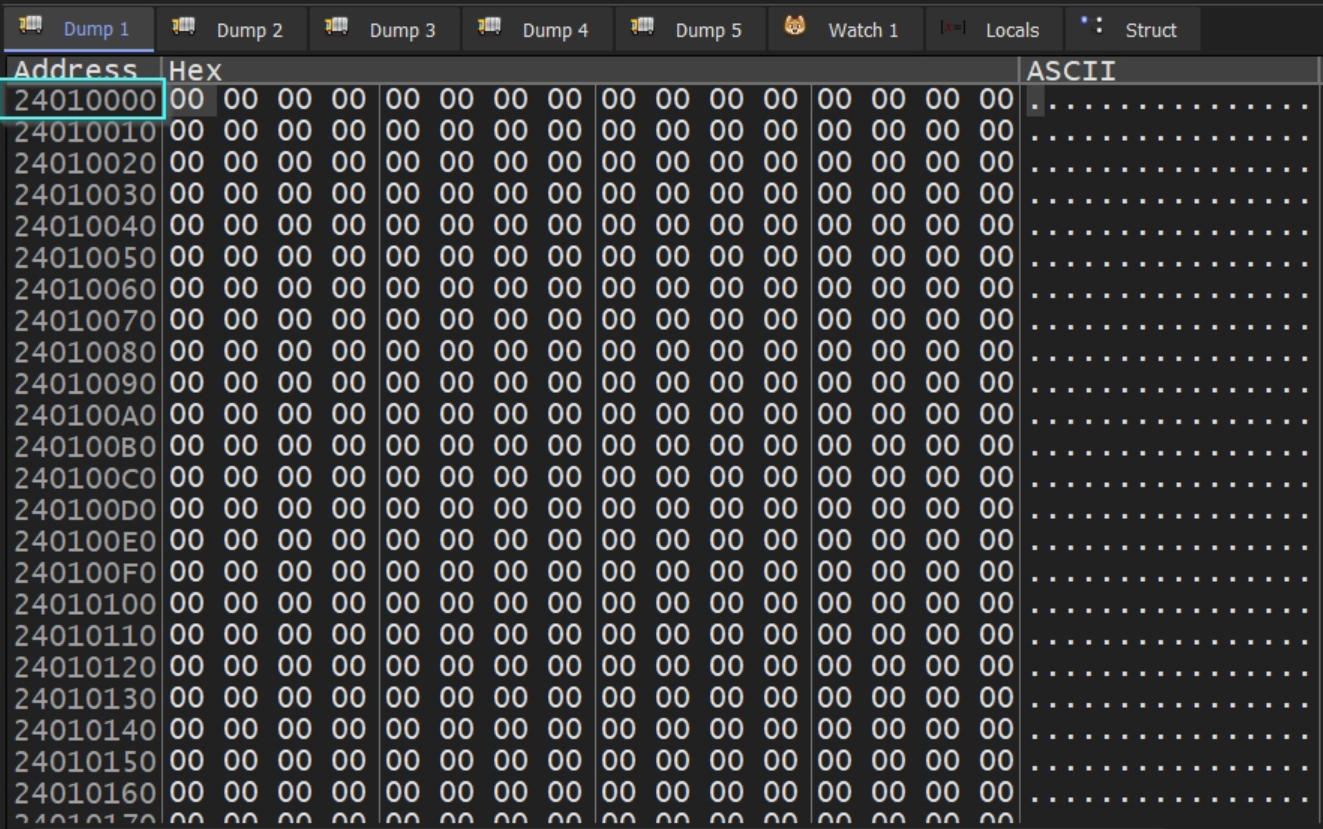
We’ll want to closely monitor any updates to this memory address as the program executes to catch the unpacked code. So, next, right-click the line 24010000 in the Dump → Breakpoint → Memory, Write → Restore on Hit. We want “Restore on Hit” so we can catch multiple writes to this region of memory rather than just a single write.
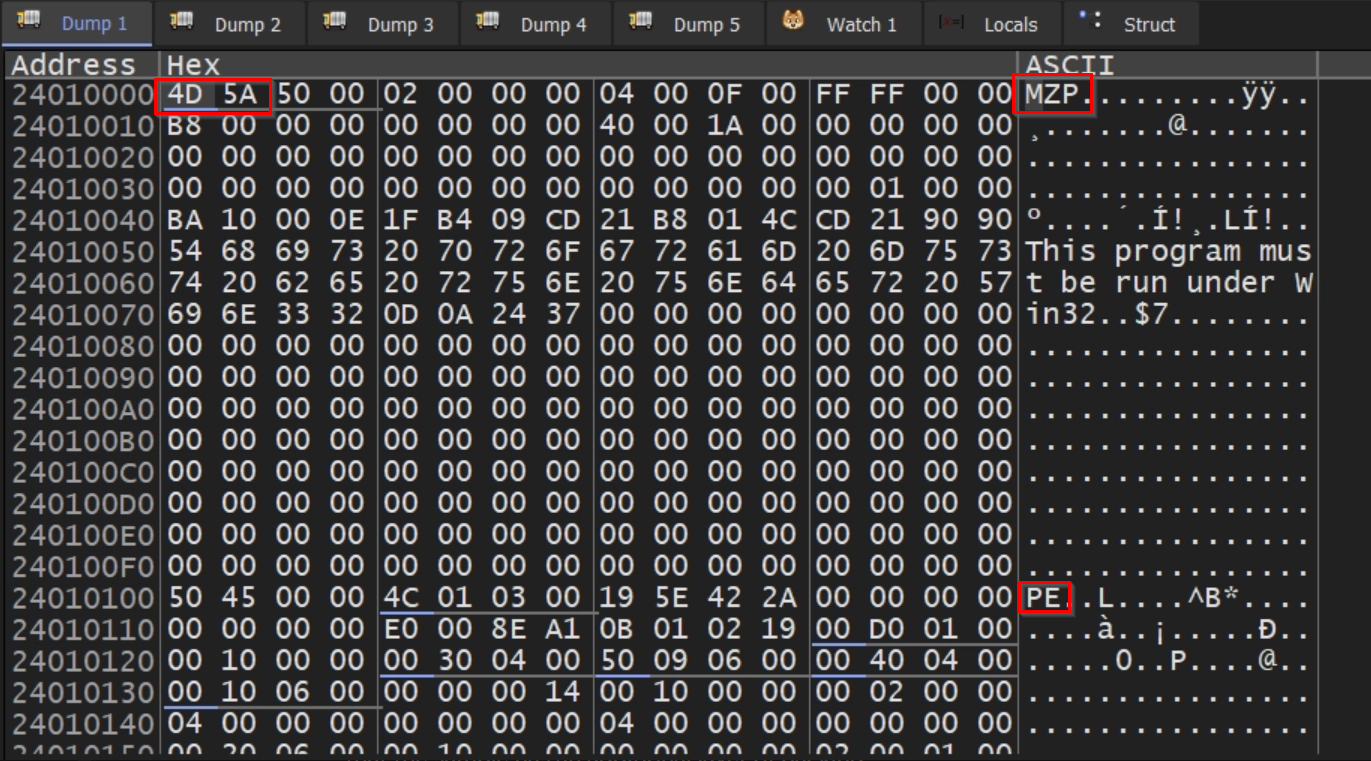
PE In Memory!
Next, you’ll want to disable the VirtualAlloc breakpoint (otherwise the debugger will keep hitting VirtualAlloc over and over again and you’ll waste a bunch of time). After doing that, hit Run till Return ⬆️.
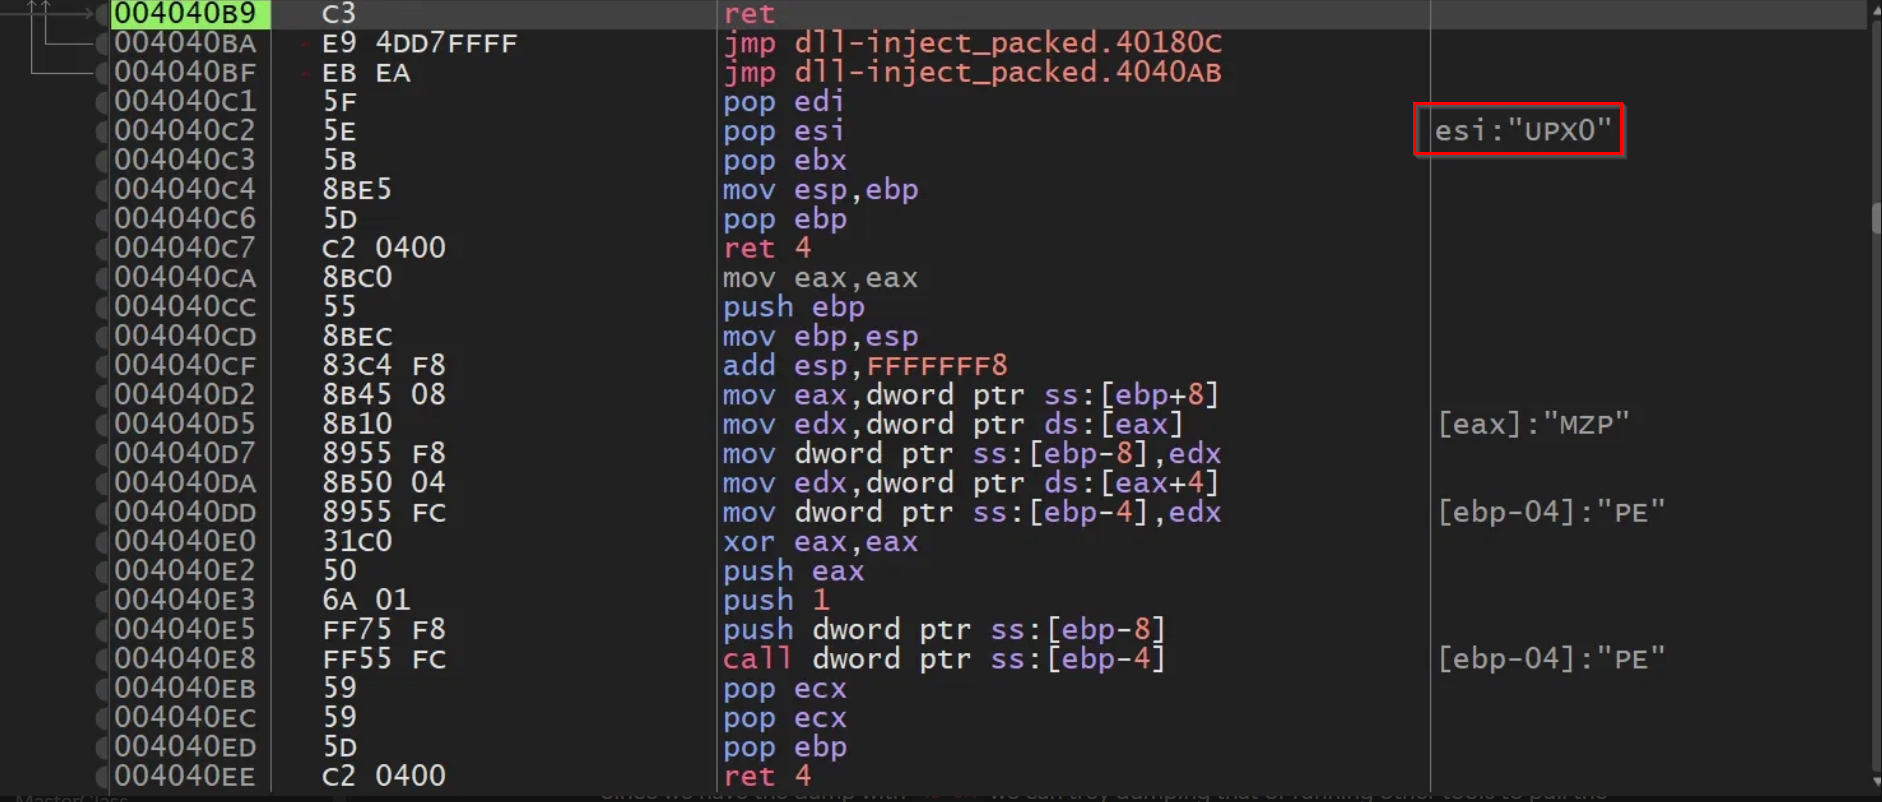
Next, we’ll want to hit Run till Return ⬆️ again to completely resolve the VirtualAlloc and get the entire exe written into memory. Notice the ESI register contains UPX0, that’s evidence potentially that the sample has an additional layer of packing alongside the one we just defeated.
Extracting the PE
Since we have the dump tab with 4D 5A (PE magic bytes) and we returned out of the function, we can try dumping that or running other tools to pull the payload out. There are two options I tested with this sample, that can commonly work on others if you have complete PE in memory:
- Option 1 is to go to the “Memory” tab and find
24010000(The EAX value from before) and right-click → Dump to file, then call itdump.bin

- Option 2 is to get the process ID from x32dbg and use pe-sieve (Install here) to pull it out for us instead, which is easier and ensures we get the right size. Run the following command to do pe-sieve:
1
pe-sieve32 --pid <PID>
The process will still need to be running in x32dbg since you need a running process ID
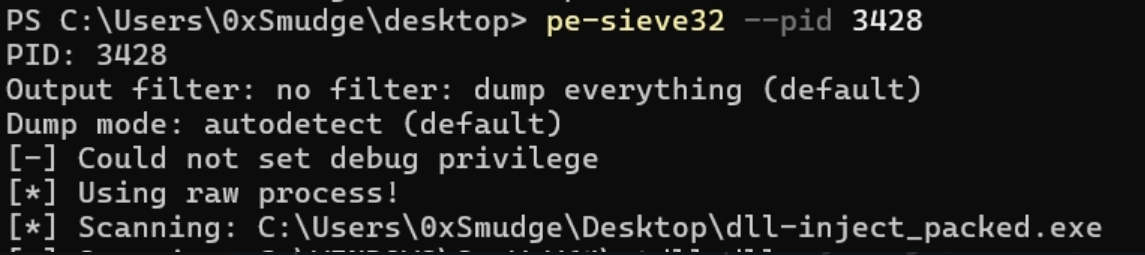
Running pe-sieve shows us the output of the scan:
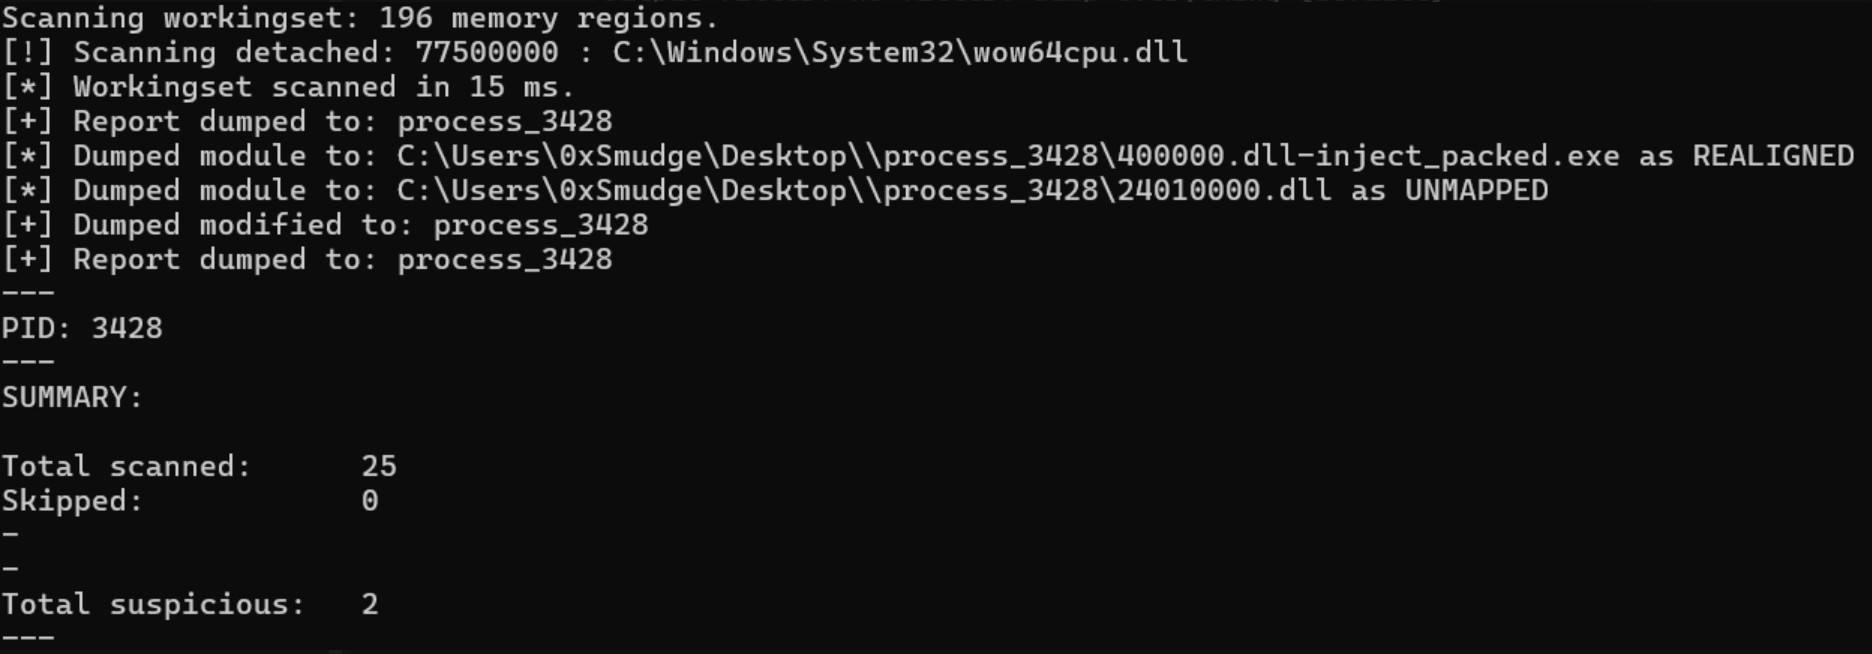
Since the scan was successful, we can cd to the folder that pe-sieve creates, and check what’s there:
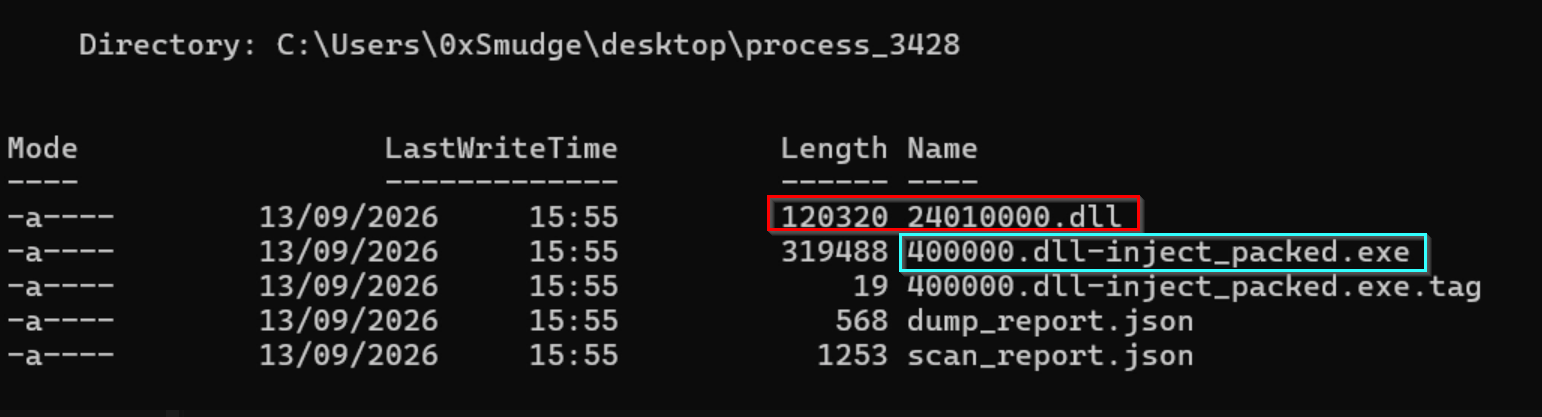
Specifically, notice:
24010000.dll→ The extracted payload, the memory address was used to name it400000.dll-inject_packed.exe→ The original executable that is still packed
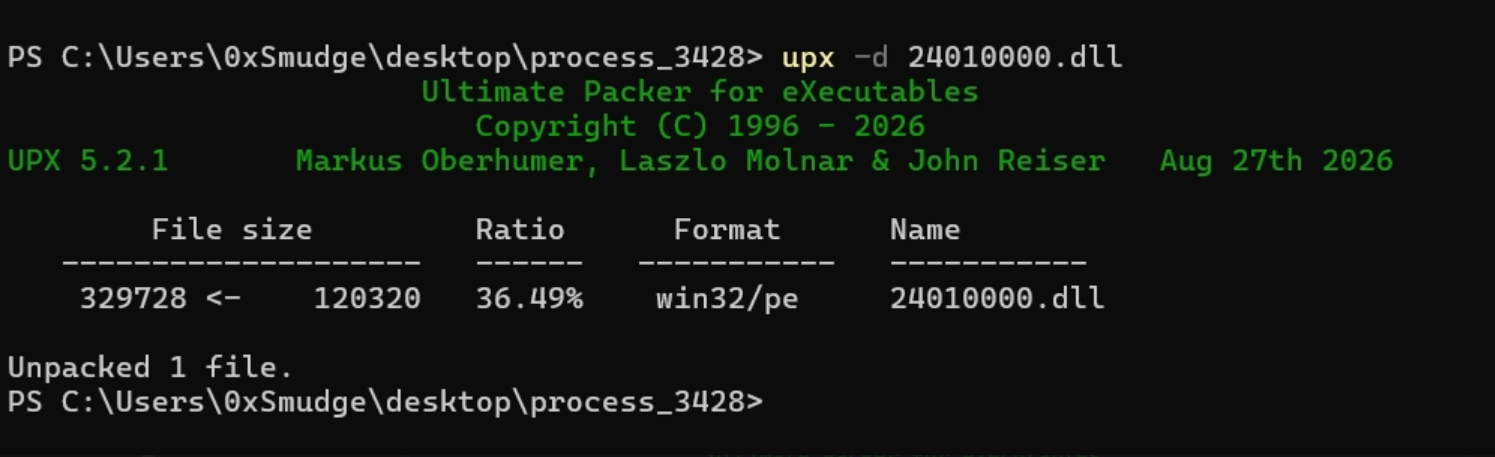
Next, because we saw UPX0 in the debugger code in the ESI register, we can test the hypothesis that there is a second layer of packing involved using it on the extracted payload 24010000.dll :
1
upx -d file.dll
And success, UPX successfully unpacked the payload. It doesn’t make a new file for you, instead it just unpacks UPX from the 24010000.dll, so that file remains as your fully unpacked version.
Grabbing the Filehash and Checking our Work
You might be thinking, this is all well and good but how do we know we have the correct/complete sample? Well lets make sure. Firstly we’ll need the file hash for the unpacked program:
1
Get-Filehash -Algorithm md5 file.dll

The file hash is below:
1
2
md5: FD36975AC51B22D5EE4194BF98A0402F
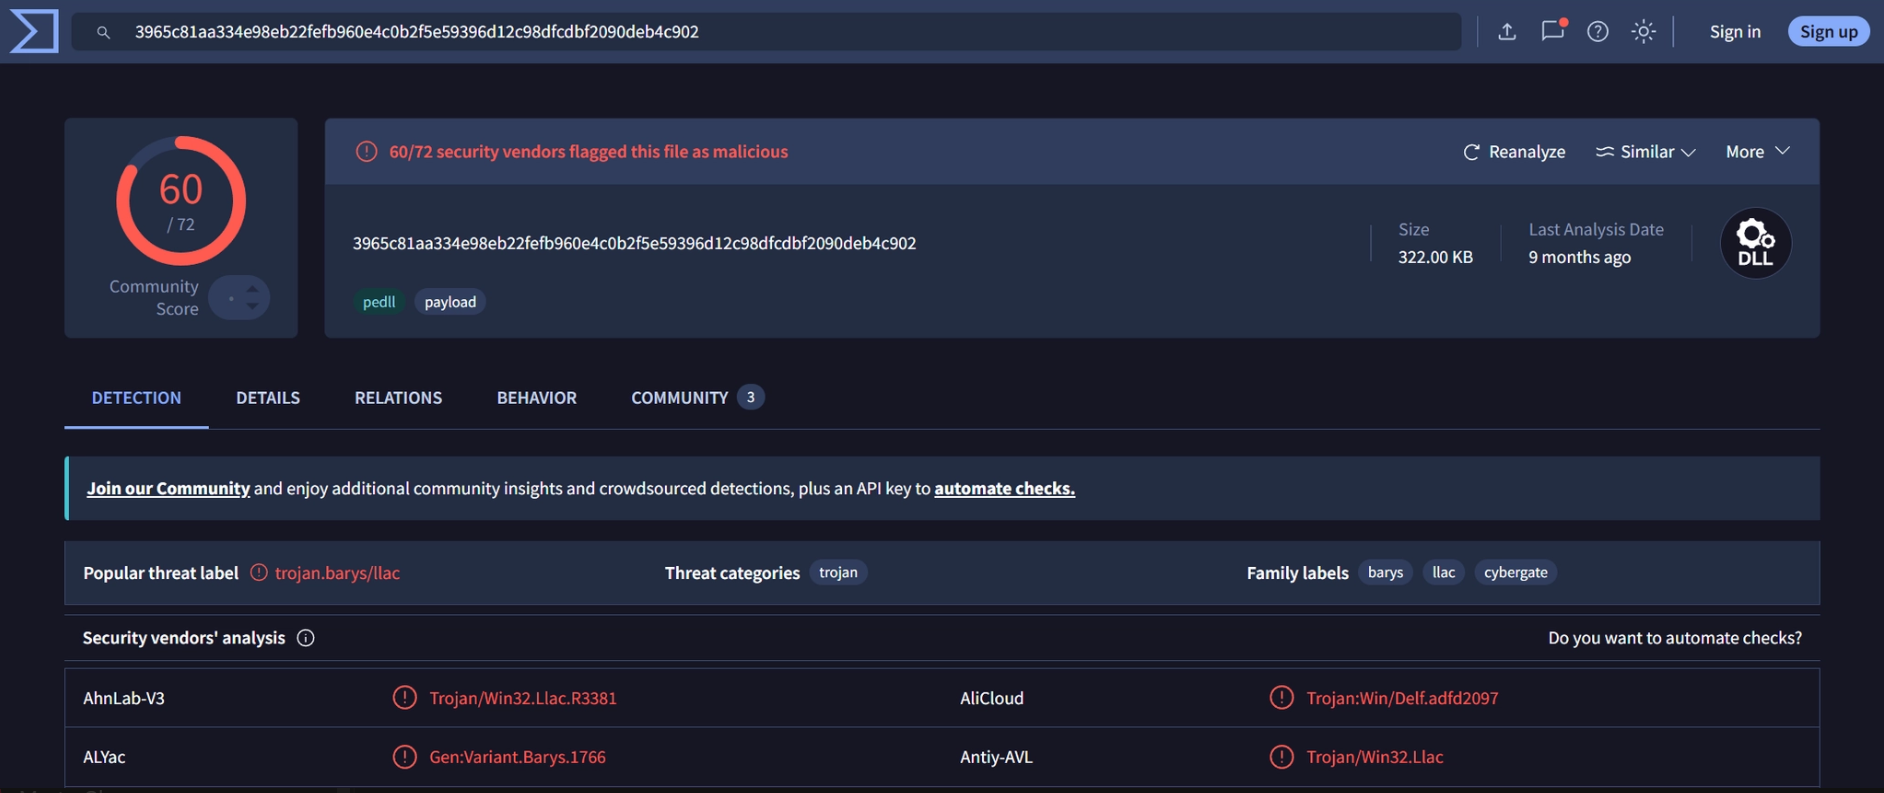
sha256: 3965c81aa334e98eb22fefb960e4c0b2f5e59396d12c98dfcdbf2090deb4c902
Reviewing the hash in VirusTotal confirms a hit so we correctly unpacked the payload, it comes out as CyberGate RAT!
Conclusion
Unpacking malware is a fundamental skill for any malware analyst, without it, a significant portion of real-world samples will appear as an incomprehensible wall of encrypted or compressed data in a disassembler. The double-packed nature of this sample, a custom outer packer wrapping a UPX packed CyberGate RAT DLL, is representative of what you’ll encounter in the wild, where malware authors layer protections to slow down analysis. The methodology covered here applies broadly regardless of the specific packer: identify the suspicious indicators, find the allocation, watch for the payload being written, and dump it cleanly. With the unpacked payload in hand, your real analysis can begin.